2013/05/21

MSRAL 2013 Presentation--Part 2: Direct Imaging of Explanets

There's no longer any question that planetary systems appear to be the norm and not the exception.  But what does it take to observe them?  Can only the pros do it?  Or does an amateur have a fighting chance?

How might an amateur be able to observe an exoplanet?

To answer that question, we'll first ask:  how might an exoplanet be observed?  Let's not worry about technology just yet...assuming that we have the equipment, what techniques might allow us to "see" a distant world?  And can amateurs do them?

The most obvious answer is to take a picture of one!  After all, we're used to seeing things every day.  Much of what we know exists is because we can lay our eyes on it.  So, is it possible to take a picture of another world?  Surely planets are too small and too distant and near stars that are too bright for us to take a picture of one.  Direct imaging of an exoplanet isn't possible with even the best equipment available.  Right?

Well...

Three images of Beta Pictoris taken over 7 years time.

In 2009 the ESO's VLT imaged Beta Pictoris.  It did so in such a way so as to remove much of the star's glare.  What was left revealed a bright spot.  In 2009, a second image was taken.  Then again in 2010.  The resulting images reveal a planet in a near Saturn sized orbit.  

OK, there's more data behind the pictures.  These three images aren't enough to convince many that the bright spot is a planet.  It could be another star with a high proper motion.  And these images do nothing to show the object has or can change directions as one would expect an orbiting planet to do.  But supplementary data exists to show that the bright spot is, indeed, a planet with roughly the mass of 7-11 Jupiters.

And it was caught on film!  Well...caught on camera anyway.

And it's not the only system where exoplanets been imaged.  Hubble has imaged Fomalhaut over several years to reveal a similar bright object projected to orbit its host star.

A bright dust ring and embedded exoplanet imaged around Fomalhaut. 
Yeah, OK.  Hubble the VLT, these are some serious telescopes!  Certainly there's nothing a typical amateur can do to directly image an exoplanet...

...or is there?
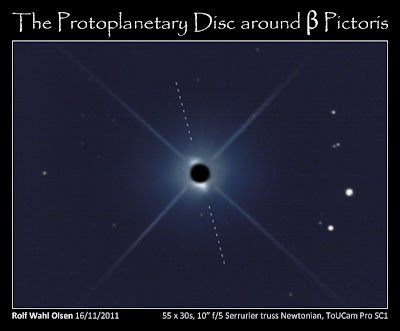
Photo taken by Rolf  Wahl Olsen showing the dust disk surrounding Beta Pictoris
In 2011 Rolf Olsen took an image of Beta Pictoris.  Well, many images actually...and some of Alpha Pictoris as well.  When processed together, an image emerged that shows the dust disk surrounding Beta Pictoris.

How did he do this?  

The basis technique is to image the target star...the one with the dust disk.  Then image a comparison star.  The trick is to image a comparison star under the exact same conditions as the target star.  Color, magnitude, altitude, exposure time, etc...anything that may be different and effect the amount of captured light should be as identical to the target star as possible.  Scientific papers on the Beta Pictoris system suggest using Alpha Pictoris for its proximity and similarity.

We now have two images...one of a star that we presume has "extra" light around it reflected from a planetary disk--or even a planet!  And a second with a "normal" star without any extra sources of light around it.  Subtract the two.  In theory, the resulting image will only have the "extra" sources of light in it.  i.e.: the reflection of the dust ring or...if extremely lucky...the reflection of light off an exoplanet!

In Rolf's image, the dashed line marks the known orientation of the dust disk.  The bright "wings" off the star in the image align pretty darn well with the expected orientation!  When you sit back and think about it, this is a phenomenal piece of work!  Even f you don't want to spend the time to think about it, this is a phenomenal piece of work!  Just trust me on that :)

Sure, not exactly an exoplanet image.  And it may yet be a long time...maybe never...before we have the technology to truly image an exoplanet from our backyards.  But this is impressively close!  

Beta Pictoris doesn't spend a whole lot of time in my observable sky.  But I wonder if this can be repeated with, say, Fomalhaut???

I'm itching to try!!!

2013/05/20

MSRAL 2013 Presentation--Part 1: My First Observer Transit

This is the first of what should be a several part blog of my presentation on exoplanet observing given to the Mid-States Regional Astronomical League convention at Mahoney State Park in Nebraska on April 18th 2013 (yikes, that sentence kinda runs on and on...)  I'll try and get to the remaining parts over the next week or two with the plan of blogging what I should have said during the presentation ;)

I'll skip the bit about the broken Kepler satellite and the just announced Transiting Exoplanet Survey Satellite (TESS)...lots of better information on those missions elsewhere on the net!  Instead I'll jump straight ahead to the video challenge...

Can you spot the exoplanet in this data?

Believe it or not, there is at least one exoplanet in that video!  Good luck finding it!

Some things to note while watching the video:

1)  The frames were take on an Alt/Az mount!
2)  While in most frames the star images are reasonable (though maybe not pretty picture quality!) there are plenty of frames in there where the tracking was less than perfect.
3)  It's fun to look for the cosmic ray hits in the frames early in the video.  It is fun.  Try it.  It's easier early in the video when the background is dark.  OK, stop trying now...this video isn't high enough quality to see them, but they're there.
4)  The hot pixels are a little disconcerting the way they never move while the stars do.  Again, easier to note earlier in the video.  Again, the video isn't high enough quality to really see them...sigh.
5)  The background increases quite substantially over the course of the video.
6)  There is significant vignetting.
7)  There are dust donuts.  These are easier to see later in the video as the background raises.
8)  See what else you can notice.  Comment about it so others can notice it too!

Noticing these sorts of things is one reason why I'm so interested in exoplanet observing.  Other than general curiosity, I'm not particularly interested in exoplanets.  I mean I'd like to know more about them, but not so much that I feel I need to study them in depth.  So why observe them?  Partly the challenge, but mostly the noticing.  I enjoy tinkering with software/hardware and seeing what I can learn about them.  A long series of short exposures can tell you quite a bit about your equipment and technique!

But back to the exoplanet!  To help you out, here's a finder image with the parent star indicated.

XO-2b finder image

The movie frames are mostly upside down (though often sideways as well!) from the finder frame if that helps.  The specific exoplanet we're looking for is XO-2b.  This data happens to be the first full transit I was able to measure and I'm pretty proud of it :)

But you still can't see the exoplanet can you?  How about now?

XO-2b transit lightcurve

OK, what happened there?  That's not an image!  Well, no, it's not.  But it is an observation and it is an exoplanet.  Scientific observing tends to be much different than optical observing.  A friend of mine who knows I'm into astronomy once sent me a link to an article about the first direct observation of a black hole.  The article had a nice "artist's rendition" of a black piece of sky with a star being stretched and swirled tightly around it.  My friend thought this was a real image, that scientists had managed to take a picture of a real live black hole!  Reading the article, it was hard not to draw that conclusion!  The reality is way more abstract.  In this case the "direct observation" of a black hole amounted to plots not too different from the one of XO-2b above.  I believe the plots were light curves of x-rays emitted by some cloud of matter as it swirled faster and faster until it crossed the event horizon.  I was never able to chase down the raw data that "showed" the black hole.

But scientists are very comfortable with their plots and graphs.  There is much more to see in the charts and graphs than one can hope to observe with eyes alone.  In this case, we have a plot that allows us to "see" an exoplanet!

The plot itself is a plot of amplitude (y-axis) vs time (x-axis).  In a future part to this MSRAL blog, I'll detail exactly how the computations are performed.  For now, it's enough to know that the plot is of amplitude vs time.  Each point represents data from a single frame with the entire plot spanning several hours of data (and I was awake for all of them on this particular occasion--thankfully this would prove *not* to be the normal case!)

The line represents a best fit of the data to a model predicting the XO-2b transit.  The data looks a mess with barely a dip discernible, but the line has a nice dip exactly where it should were XO-2b transiting its host star during the observed time period!

At this point, you may be asking yourself: why are there two plots?  Again, more detail on that later, but basically the top plot is the "raw" data and the bottom plot has "systematic errors" removed.  In this case, the "systematic errors" were virtually nonexistent and had little impact on the raw data.  They didn't.  Really.  For now, trust me on that.  Really. :)

And that's it!  With data take with an 11" SCT on an alt/az mount repositioned several times during the evening with increasing light pollution (the increasing background was light pollution from several sources) I was able to observe the transit of XO-2b.  

Luck?

Not really.  Sure, we've only had convincing evidence of exoplanets for a few decades now--hardly any time at all.  But like so many things in science, once you know what you're looking for, it becomes easier to find it!  You can go to Exoplanet Transit Database to see all the transits I've reported thus far.  I still have about a dozen or so unreported transits sitting on my hard drive, but more on that latter!

Is this the easiest, best way to observe exoplanets?  Not by a long shot!  But it worked.  This was just the beginning of a journey.  Well, actually, the beginning was the 3-4 utter failures attempted before this one!  But we'll call this the beginning...for now...And I have improved over time as can be seen by comparing these two light curves of Hat-P-12b.


My 4th ever full transit: Hat-P-12b
My 29th ever full transit: Hat-P-12b

The dip in the plot indicating an exoplanet transiting in front of it's host star is significantly more pronounced in my later attempt at this target.  It's hard to tell from these plots but the main reason for this is increased data quality due to a more refined technique.

The journey continued...with a brief hiatus as we moved from Illinois to Missouri...and continues still.  The goal?  Well, there are several goals.  Selfishly, I'm after continued improvement.  I'd like to perfect the craft and learn whatever I can along the way.  Less selfishly, I'd like to pass this knowledge on.  It's nice to learn from one's own mistakes, but a truly clever person learns from the mistakes of others!  I've made more than my share of mistakes...how many clever people are there out there to learn from them?

2013/04/29

An Attempt to Observer Kepler-10b

The Plan

The plan was to make another attempt at observing a Kepler planet.  I've tried a couple a few before, but for the most part, the Kepler host stars are too dim or the transits to shallow for me to have a reasonable shot.  Kepler-10b seemed within reach because 1) this gentleman has done it with somewhat similar equipment and 2) my observations of Hat-P-13, which is similar magnitude, yielded some very respectable results.  Even so, I knew going in Kepler-10 with it's very shallow transit depth would be a tough target!

Since I had some time during the day, I also thought this would be a good time to try and piggyback a small refractor to acquire simultaneous data.  I'll go into more detail on my setup in a later blog, but basically for this session I had a CPC1100 imaging with a QSI520 and an R filter, an Orion 80st imaging with a QSI583 and a luminance filter and guiding with a lodestar in a Giant Easy Guider.  3 imagers being controlled at the same time!  After some fiddling to align the Orion to roughly the same field of view as the CPC, everything worked rather well!  I'm not sure how often I'll do this though...the Orion has quite a bit of coma and vignetting with the QSI583--but still plenty of usable area, so maybe...

The Data

The CPC/QSI520 acquired data at a cadence of 120s, 1x1 binning and cooled to -20C.  The Orion/QSI583 ran at 60s, 1x1 binning cooled to -20C.  In retrospect, I should have ran them both at 120s.  I started data acquisition when Kepler-10 was only 16 degrees above the horizon.  I'm generally pretty lazy and go to bed as soon as everything is up and running.  With the start of acquisition that low in the sky, I was worried about how much brightening would happen as it rose.  I've lost runs int he past where the target star brightened into saturation during the course of the night!

The Results

I'm sorry to say I did not observe a transit.


  Yeah, looks pretty ugly.  It's possible a better selection of aperture and annulus would yield better results, but probably not the factor of 3 or so they'd need to get up there with my best--and certainly not the almost order of magnitude they'd need to match this!

But there's still some interesting things to talk about in this data run...

First, there is a general improvement in the scatter from start through to finish (well, if one ignores the bit in the middle which we'll discuss in a moment).  Early on, there's a lot of scatter int he data.  Near the end (which is roughly 7 hours later, by the way) the magnitude variances are looking more compact.  This is primarily because the initial data was at 16 degrees above the horizon while the final data was closer to 80 degrees.  This is a nice little demonstration of the effects of atmosphere!  Low down on the horizon, the noise is much higher--scintillation, light pollution, and atmospheric extinction.    I'd guess extinction and light pollution dominate scintillation at my location but I could only guess which of those two contributes more.

Second, if we look at some raw data, we can see some interesting effects as well.

This is a plot of "magnitudes".   The magnitudes are non-normalizad measures of flux plotted on the same scale as magnitudes (each "magnitude" is 2.5x the previous "magnitude").  The data can be normalized to absolute magnitudes, but all we're interested in here are relative intensities and did I mention I'm lazy?

So what's interesting about this plot is that magnitudes change all over the place!  In the first third of the evening, there's a general downward trend in magnitude as the star gets brighter as it moves higher in the sky and the light gets to travel through less air mass.  But then what happens?  The stars get dimmer again?  That's most likely passing clouds.  If one were outside looking up, maybe there would be a some nice halos around brighter objects, but the clouds weren't thick enough to disrupt the auto-guider--or if they did--not for very long.  This is the reason for the large scatter just after predicted mid-transit in the first plot above.  

What's interesting is the CPC has a narrow field of view.  Any clouds passing through the field tend to cause nearly uniform extinction across the entire field.  Certainly some of the increase in scatter is due to passing clouds dimming the comp and target stars differently at different times, but the bulk of the scatter likely arises from reduced signal to noise.  I say that because this transit of CoRoT-1 showed a very similar light curve for individual stars where passing clouds caused large changes in observed magnitudes and yet, the scatter across the entire data set is pretty uniform.  Looking at the CoRoT-1 transit plot and model fit, one would be hard pressed to identify when the passing clouds happened.

I'll try and remember to blog about it more in the future, but this shows the power of differential photometry.  With differential photometry, the goal is to measure differences between two sources in the same frame.  Since the sources are int he same frame, there is a much reduced chance of differences in the way the sources were measured.

Maybe Next Time??

So, no positive transit observation this time.  Still not a complete loss--in fact, the results were very much what I expected going in--Kepler-10b is likely out of my current reach.  I do now know I can piggyback the refractor (that data is interesting as well, but out of time here) and control everything at the same time.  That's a good thing.

Now I'll have to think a bit more about how to improve for next time!

2013/04/28

Exoplanet Observing Resources

Once upon a time there were nine planets.  We demoted one.  Then, as if to show it's disdain, the universe spit forth planets by the multitudes!  We now have databases that contain evidence of thousands of planets and it's looking like planetary systems are the norm--not the exception.

I'm not going to go into the history of exoplanets in this post (but will say we started finding new planets before poor Pluto was demoted).  Instead, I'm going to list out some resources I've found helpful and or interesting over the years as I've tried to become more proficient at making exoplanet observations.  Yes!  You can observe other worlds from your own backyard.  It's both easier and more challenging than one might think...but that too is a topic for many future posts.

Here is a list of resources for those interested in observing exoplanets:


This is currently my favorite.  The site's design is showing its clunkiness as the number of transiting exoplanets steadily increases.  Keep in mind it's a site run by an amateur club and they're doing an excellent job of collecting amateur observations and keeping up with new information as it comes in.

This is a great site to visit to plan out an observing session.  Enter your latitude/longitude and you can view a list of predicted transits as well as important information to help you plan an observing session.  Very helpful when trying to find an event in your viewable sky during your observing window.  There are also tools to model fit your data and cool plots and diagrams of your results.

I have many observations listed here.  My son also has a few.  I would encourage everyone who has made transit observations to submit them to this site.  The data is open to all for study and if your data is used for publication you will receive credit.


There is a wealth of exoplanet information here!  It's fun to mine through the data and marvel at the amount of effort that went into acquiring, analyzing and presenting it.  As far as I'm aware, this archive does not take amateur submissions.  However, where the Exoplanet Transit Database only contains exoplanets that transit their host stars, the NASA archive contains information on exoplanets found by ANY method.  There's data on exoplanets found by imaging (very few!!), radial velocity and micro-lensing as well as well as transiting.  There's even a few discovered by transit time variance.  Basically, if it's thought to be an exoplanet, it's in there!


For a number of years Bruce Gary maintained this site to collect amateur observations and to provide helpful research information on technique.  The site is currently closed to new submissions and point to the Exoplanet Transit Database as the preferred place to submit your observations.  The site does still contain a wealth of information on technique that anyone wanting to observe exoplanets should read.  Bruce has written a book called Exoplanet Observing for Amateurs on the subject which you can still find in printed form or you can get the PDF.


If one does any astronomical observing of any kind, one should visit Cloudy Nights!  It's a great place to hang out on...well...cloudy nights.  I find rainy days work well also.  Lots of forums with tons of great people offering helpful advice on everything and anything astronomy related.  Looking to buy a new scope, asky these guys what they think!  Trying to image...well, there are some darn good images there!  And lots of folk who aren't good images but are willing to show off what they can do which provides a very real look into the learning process and what you can expect trying to do the same.  

It's great if you can learn from your own mistakes, it's more convenient if you can learn from other peoples mistakes...and this is what I like best about Cloudy Nights!  To be fair, I've posted many of my own mistakes to help others learn as well.

There's not a specific form for exoplanets, but the Variable Star and Radio Astronomy forum tends to be where us science geeks hang out.  Many of the techniques for measuring exoplanet transits are similar to other photometric pursuits so there is some crossover with variable star observing.  The important thing is to ask questions and decide for yourself just how much the answers apply to your specific situation.

It's getting dark enough now I can hopefully finish setting up an Orion 80 on my CPC1100.  I'm hoping to try something new tonight...going to try and measure the transit of Kepler-10b with both the piggyback refractor and the CPC simultaneously...maybe we'll talk about that experience in the next post...